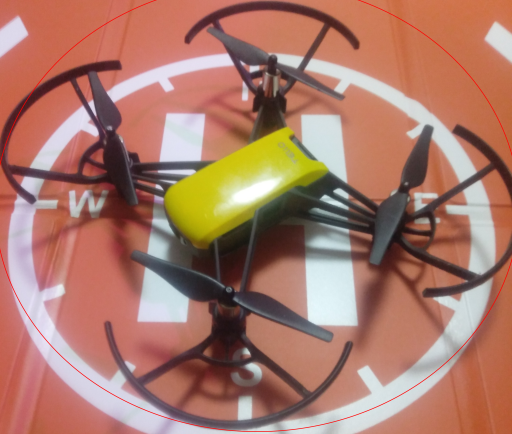

いよいよ面白くなりTelloを飛ばすことはできましたが、本来の機能であるカメラ画像の送信が生かされていない( ;∀;)
まだお持ちでない方、2台目希望の方 プログラミングドローン ”Tello” の購入はこちらドローンのプログラミングでどうやって画像をPCに送信したらいいだろう? YouTubeをたまたまみていたTechの部屋に出会いました。しかし私はプログラミング初心者でしかもTechの部屋のPCはMAC かなり勉強になりましたが、私はPCはWindowsでしたので、参考にして我流でしてみました。オープンソースはGitHub Tech の部屋「Pythonで小型ドローン Tello EDU を飛ばす!」サンプルプログラムからダウンロードできます。
まずOpenCvのダウンロードからです。
OpenCV(正式名称: Open Source Computer Vision Library)とは、オープンソースのコンピューター・ビジョン・ライブラリです。コンピューターで画像や動画を処理するのに必要な、さまざま機能が実装されており、BSDライセンスで配布されていることから学術用途だけでなく商用目的でも利用できます。加えて、マルチプラットフォーム対応されているため、幅広い場面で利用されていることが特徴です。
画像処理 (Image Processing)構造解析 (Structural Analysis)モーション解析と物体追跡 (Motion Analysis and Object Tracking)物体検出 (Object Detection)などが可能です。
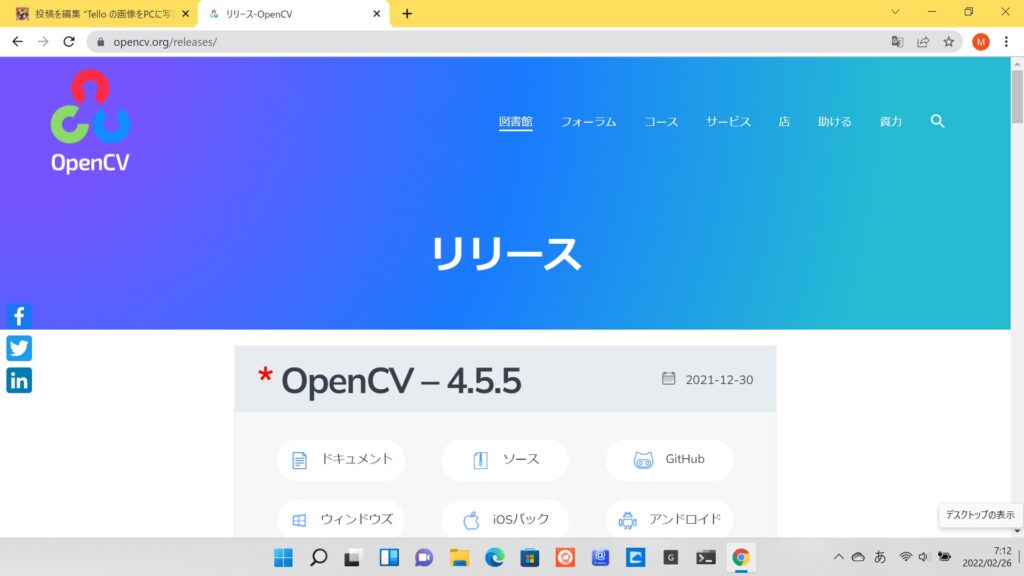
リリースのウインドウズをクリックしダウンロードします。ダウンロードしたら展開してopencvのフォルダーをCドライブの直下に置きます。OPENCVのファイルの中のbild→x64→vc15→binを開きこのアドレスをコピーし、コントロールパネルから
システム&セキュリティのシステム環境変数に追加するため、Pathに先ほどコピーしたアドレスを追加します。
pythonでopencvを使いたいので opencv-pythonをpipを使用してインストールできます。
インストールする場合は以下のコマンドを使用します。
pip install opencv-python

コマンドプロンプトからですがアプリの右クリックで管理者として実行で起動させます。
オープンソースはGitHub Tech の部屋「Pythonで小型ドローン Tello EDU を飛ばす!」サンプルプログラムからダウンロードしたファイル cli.py(先のTello3.pyと同じプログラム) & vc.py(画像送信プログラム)
OpenCVが使われている箇所を強調してみました。
#vc.pyの内容は以下の通りです。
Tello Python3 Control Demo
http://www.ryzerobotics.com/
1/1/2018
Modified by MPS
#
import threading
import socket
import time
import cv2 ⇒ ここでOpenCVがインポートされている
host = ”
port = 9000
locaddr = (host, port)
Create a UDP socket
sock = socket.socket(socket.AF_INET, socket.SOCK_DGRAM)
tello_address = (‘192.168.10.1’, 8889)
sock.bind(locaddr)
def recv():
while True:
try:
data, server = sock.recvfrom(1518)
print(data.decode(encoding=”utf-8″))
except Exception:
print(‘\nExit . . . RECV\n’)
break
print(‘\r\n\r\nTello Python3 Demo.\r\n’)
print(‘Tello: command takeoff land flip forward back left right \r\n up down cw ccw speed speed?\r\n’)
print(‘end — quit demo.\r\n’)
recvThread create
recvThread = threading.Thread(target=recv)
recvThread.start()
sock.sendto(b’command’, tello_address)
print(‘command ok’)
time.sleep(0.5)
sock.sendto(b’streamon’, tello_address)
print(‘stream on’)
time.sleep(1)
sock.close()
cap = cv2.VideoCapture(“udp://%s:%s?overrun_nonfatal=1&fifo_size=50000000” % (‘192.168.10.1’, ‘11111’)) ⇒ #ここでビデをキャプチャーでTelloのカメラから画像受信
print(‘start cap’)
while True:
try:
ret, frame = cap.read()
if ret:
cv2.imshow(‘tello’, cv2.resize(frame, (360, 240))) #受信画像を画面表示
cv2.waitKey(1)
except KeyboardInterrupt:
cv2.destroyAllWindows()
cap.release()
print(‘\nExit . . .\n’)
break
をデスクトップでも貼り付けます。
あとは 各ファイルを実行できるようにコマンドプロンプトを2つ起動させます。
それでは、準備が整いましたので 2つのプログラムを同時に実行させてみます。動画をとってますので御覧ください。
次にOpenCvによる顔認識の仕方こちらへどうぞ!!
youtubeチャンネル登録お願いいたします(^^♪
エラー: 接続されたアカウントがありません。
アカウントを接続するには、YouTube Feeds の設定ページに移動してください。
-
知りたかった、Telloの中身をのぞいてみた・これがTelloだ!!
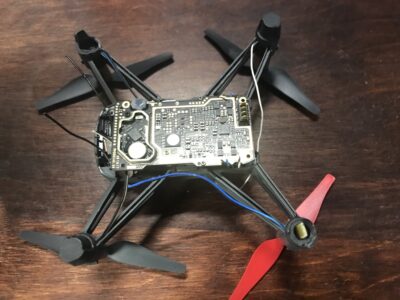
DJI Tello 基板【ちょっと解説】 ※DJI公式非公開のため、一部は分解事例・基板配置からの確定度の高い…

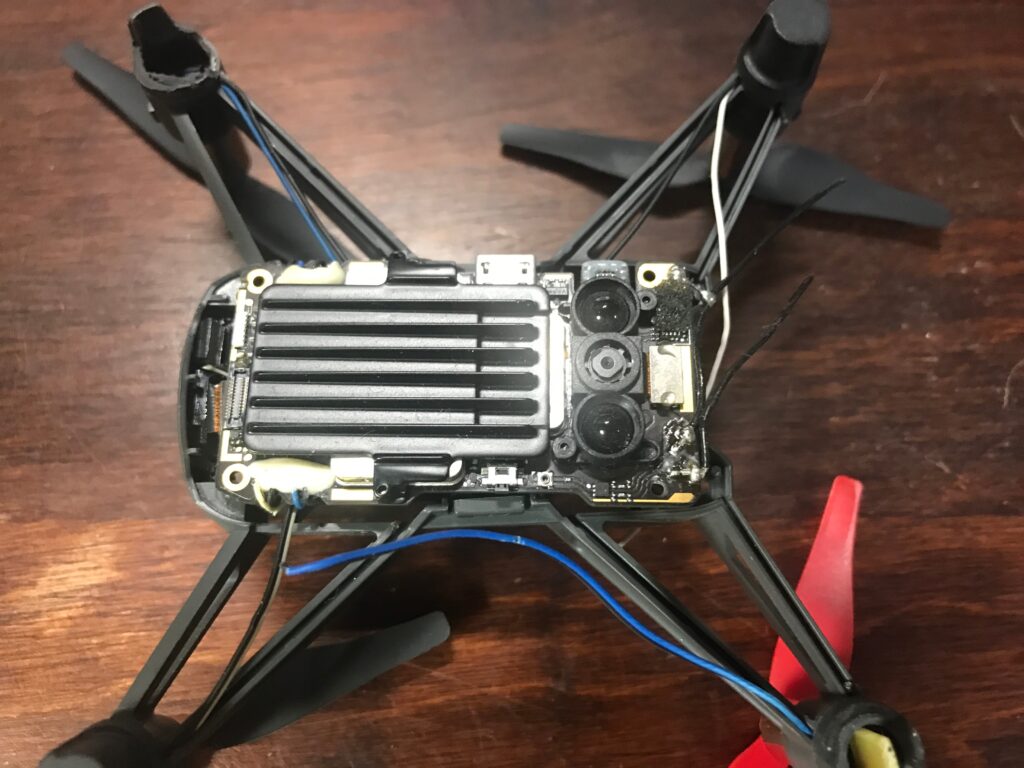
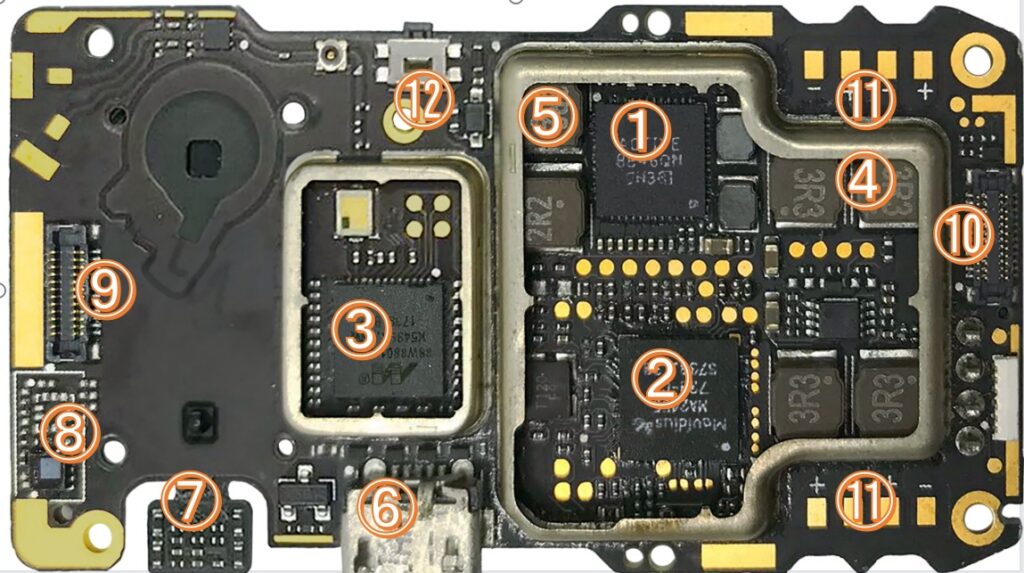
DJI Tello 基板【ちょっと解説】
※DJI公式非公開のため、一部は分解事例・基板配置からの確定度の高い推定です
① メインフライトコントローラ(SoC・System on a Chip))写真右上中央(大きな黒IC)
正体
- ARM Cortex系 SoC(DJI独自仕様)
役割
- 飛行制御の中枢
- PID制御
- センサーフュージョン
- モーター出力計算
- 通信制御の司令塔
教育的表現
「考えて・判断して・命令を出す“脳”」
② セカンダリ制御IC(制御補助 / センサーハブ)写真右中央(①の下)
正体
- 制御補助用MCU or DSP系IC
役割
- センサー処理の分担
- リアルタイム性の高い処理
- メインSoC(System on a Chip)の負荷軽減
「脳の右腕(反射神経担当)」
③ Wi-Fi / 映像処理SoC。 写真左中央(金属枠内)
正体
- Wi-Fi通信+映像エンコードSoC
役割
- 映像圧縮
- UDPストリーミング
- SDK通信
Pythonで
streamonした時に働く心臓部④ ESC制御+モータードライバ(その1) 写真右上(3R3表記の横)
正体
- ESC電源・制御系IC
役割
- モーター回転制御
- 高電流制御
ブラシ付きモーターを直接制御
⑤ ESC制御+モータードライバ(その2)写真右上(①の左)
役割
- 別モーター系統担当
★ ④⑤+⑩などで 4モーター分
⑥ 下向きToF / VPS電源・制御部・写真下中央(USB近く)
正体
- 距離センサー制御回路
役割
- 高度検出
- ホバリング安定
「床との距離を測る目」
⑦ IMUセンサー(6軸)写真左下(白シール横の小IC)
正体
- ジャイロ+加速度(6DoF)
役割
- Pitch / Roll / Yaw 検出
⑧ 電源管理IC(PMIC) 写真左下端
役割
- LiPo 3.7V → 3.3V / 5V
- 過電流・低電圧保護
電気の交通整理係
⑨ 下向きカメラコネクタ・写真左側フレキ接続部
役割
- 光学フロー用カメラ入力
GPSなしで止まれる理由その1
⑩ ESC制御+モータードライバ(その3) 写真右側中央
④⑤⑩+反対側で 4ch ESC完成
⑪ モーター電源ライン(+)写真右上下の「+」マーク部
役割
- バッテリー電力供給
- モーター駆動用大電流ライン
⑫ RF / クロック / デバッグ系・写真上中央小IC
役割
- 通信補助
- クロック生成
- 製造時デバッグ
工場専用(触れない)
Telloの中身は大体わかったので。。。
ドローンを自作してみたくなった(^_-)-☆
自作ドローンの入門用としてプログラミングを学んだり、センサーを追加・カスタマイズしたりするのに最適で、GPSや映像伝送(OSD)なども統合していきたいです。
しかし、これはFPVブラッシレスモーター用専用ソフトなので、いろいろコストがかかるので、とりあえずサーボモーターでやってみた。結果はサーボモーターではTRI機Yaw角度しかできなかったです。
したいことは、MultiWii(マルチウィー)など、Arduinoというマイコンボードをベースに、Wiiのコントローラー(モーションセンサーなど)と組み合わせて、マルチコプター(ドローン)を制御するためのフライトコントローラー(飛行制御装置)今回はMPU6050(ジャイロセンサー)とそのソフトウェアを使いすることです。
MultiWiiConf は Java必須です。https://www.java.com/ja/download/ それとProcessing から MultiWiiConf を起動する Processing をインストールhttps://processing.org/downloa(Processing 3.x を推奨)
-
PRIVACY POLICY Last updated September 29, 2025 This Pri…
PRIVACY POLICY
Last updatedSeptember 29, 2025 This Privacy Notice for__________ ( “we,” “us,” or “our“ ), describes how and why we might access, collect, store, use, and/or share ( “process“ ) your personal information when you use our services ( “Services“ ), including when you: - Download and use
our mobile application ( Telloコマンドコントローラー) , or any other application of ours that links to this Privacy Notice
- Engage with us in other related ways, including any sales, marketing, or events
Questions or concerns? Reading this Privacy Notice will help you understand your privacy rights and choices. We are responsible for making decisions about how your personal information is processed. If you do not agree with our policies and practices, please do not use our Services.SUMMARY OF KEY POINTS
This summary provides key points from our Privacy Notice, but you can find out more details about any of these topics by clicking the link following each key point or by using our table of contents below to find the section you are looking for.What personal information do we process? When you visit, use, or navigate our Services, we may process personal information depending on how you interact with us and the Services, the choices you make, and the products and features you use. Learn more about personal information you disclose to us.Do we process any sensitive personal information? Some of the information may be considered“special” or “sensitive” in certain jurisdictions, for example your racial or ethnic origins, sexual orientation, and religious beliefs. We do not process sensitive personal information. Do we collect any information from third parties?We do not collect any information from third parties. How do we process your information? We process your information to provide, improve, and administer our Services, communicate with you, for security and fraud prevention, and to comply with law. We may also process your information for other purposes with your consent. We process your information only when we have a valid legal reason to do so. Learn more about how we process your information.In what situations and with whichparties do we share personal information? We may share information in specific situations and with specific third parties. Learn more about when and with whom we share your personal information. How do we keep your information safe? We have adequateorganizational and technical processes and procedures in place to protect your personal information. However, no electronic transmission over the internet or information storage technology can be guaranteed to be 100% secure, so we cannot promise or guarantee that hackers, cybercriminals, or other unauthorized third parties will not be able to defeat our security and improperly collect, access, steal, or modify your information. Learn more about how we keep your information safe. What are your rights? Depending on where you are located geographically, the applicable privacy law may mean you have certain rights regarding your personal information. Learn more about your privacy rights.How do you exercise your rights? The easiest way to exercise your rights is bysubmitting a data subject access request, or by contacting us. We will consider and act upon any request in accordance with applicable data protection laws. Want to learn more about what we do with any information we collect? Review the Privacy Notice in full.TABLE OF CONTENTS
1. WHAT INFORMATION DO WE COLLECT?
Personal information you disclose to us
In Short: We collect personal information that you provide to us.We collect personal information that you voluntarily provide to us when youexpress an interest in obtaining information about us or our products and Services, when you participate in activities on the Services, or otherwise when you contact us. Personal Information Provided by You. The personal information that we collect depends on the context of your interactions with us and the Services, the choices you make, and the products and features you use. The personal information we collect may include the following:email addresses
Sensitive Information.We do not process sensitive information. All personal information that you provide to us must be true, complete, and accurate, and you must notify us of any changes to such personal information.2. HOW DO WE PROCESS YOUR INFORMATION?
In Short: We process your information to provide, improve, and administer our Services, communicate with you, for security and fraud prevention, and to comply with law.We may also process your information for other purposes with your consent. We process your personal information for a variety of reasons, depending on how you interact with our Services, including:Wemay need to share your personal information in the following situations: - Business Transfers. We may share or transfer your information in connection with, or during negotiations of, any merger, sale of company assets, financing, or acquisition of all or a portion of our business to another company.
4. HOW LONG DO WE KEEP YOUR INFORMATION?
In Short: We keep your information for as long as necessary tofulfill the purposes outlined in this Privacy Notice unless otherwise required by law. We will only keep your personal information for as long as it is necessary for the purposes set out in this Privacy Notice, unless a longer retention period is required or permitted by law (such as tax, accounting, or other legal requirements).When we have no ongoing legitimate business need to process your personal information, we will either delete oranonymize such information, or, if this is not possible (for example, because your personal information has been stored in backup archives), then we will securely store your personal information and isolate it from any further processing until deletion is possible. 5. HOW DO WE KEEP YOUR INFORMATION SAFE?
In Short: We aim to protect your personal information through a system oforganizational and technical security measures. We have implemented appropriate and reasonable technical andorganizational security measures designed to protect the security of any personal information we process. However, despite our safeguards and efforts to secure your information, no electronic transmission over the Internet or information storage technology can be guaranteed to be 100% secure, so we cannot promise or guarantee that hackers, cybercriminals, or other unauthorized third parties will not be able to defeat our security and improperly collect, access, steal, or modify your information. Although we will do our best to protect your personal information, transmission of personal information to and from our Services is at your own risk. You should only access the Services within a secure environment. 6. WHAT ARE YOUR PRIVACY RIGHTS?
In Short:You may review, change, or terminate your account at any time, depending on your country, province, or state of residence. Withdrawing your consent: If we are relying on your consent to process your personal information,which may be express and/or implied consent depending on the applicable law, you have the right to withdraw your consent at any time. You can withdraw your consent at any time by contacting us by using the contact details provided in the section “ HOW CAN YOU CONTACT US ABOUT THIS NOTICE? “ below . However, please note that this will not affect the lawfulness of the processing before its withdrawal nor,when applicable law allows, will it affect the processing of your personal information conducted in reliance on lawful processing grounds other than consent. 7. CONTROLS FOR DO-NOT-TRACK FEATURES
Most web browsers and some mobile operating systems and mobile applications include a Do-Not-Track (“DNT” ) feature or setting you can activate to signal your privacy preference not to have data about your online browsing activities monitored and collected. At this stage, no uniform technology standard for recognizing and implementing DNT signals has been finalized . As such, we do not currently respond to DNT browser signals or any other mechanism that automatically communicates your choice not to be tracked online. If a standard for online tracking is adopted that we must follow in the future, we will inform you about that practice in a revised version of this Privacy Notice. 8. DO WE MAKE UPDATES TO THIS NOTICE?
In Short: Yes, we will update this notice as necessary to stay compliant with relevant laws.We may update this Privacy Notice from time to time. The updated version will be indicated by an updated“Revised” date at the top of this Privacy Notice. If we make material changes to this Privacy Notice, we may notify you either by prominently posting a notice of such changes or by directly sending you a notification. We encourage you to review this Privacy Notice frequently to be informed of how we are protecting your information. 9. HOW CAN YOU CONTACT US ABOUT THIS NOTICE?
If you have questions or comments about this notice, you maymasashi19661109@ybb.ne.jp or __________ __________ __________ 10. HOW CAN YOU REVIEW, UPDATE, OR DELETE THE DATA WE COLLECT FROM YOU?
Based on the applicable laws of your country , you may have the right to request access to the personal information we collect from you, details about how we have processed it, correct inaccuracies, or delete your personal information. You may also have the right to withdraw your consent to our processing of your personal information. These rights may be limited in some circumstances by applicable law. To request to review, update, or delete your personal information, please fill out and submit a .
ArUcoマーカーの検出を使った、Telloのプログラミングゲーム
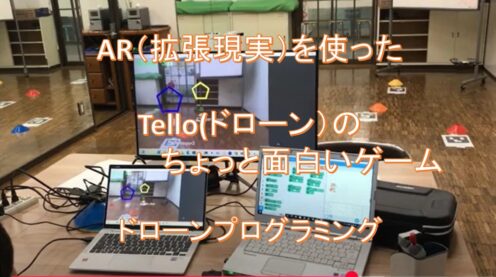
OpenCVのArUcoマーカーの検出で構築。AR(拡張現実)(Augmented Reality)とは、現実…
OpenCVのArUcoマーカーの検出で構築。AR(拡張現実)(Augmented Reality)とは、現実世界にデジタル情報を重ねて表示し、現実を拡張する技術のことです。
マーカー型は、実在の場所に配置された図形(マーカー)をカメラなどで読み取り、マーカーに合わせてデジタル情報を配置します。実際にマーカーを用意する手間がかかるものの、技術的にはシンプルで場所を選ばず比較的自由に表示できることが特徴です。
ここでは、マーカー型を動画のように使ってやっていきます。

カメラで白黒マーカーを見たとき、コンピュータは次のステップで認識しています。
【ステップ1】白と黒のパターンを見つける
- 画像の中で「黒い四角に囲まれた白い領域」を探します。
- これは、マーカーの外枠(四角い黒いフチ)です。
【ステップ2】四隅の座標を見つける
- 見つけた四角の「4つの角」を検出して、カメラから見た「角度・向き」を計算します。
【ステップ3】中身のパターンを読む
- 中の白黒のグリッド(マス目)を読み取り、それがどのIDに当たるか、**辞書(dictionary)**と照らし合わせて確認します。
ARマーカーの構造
⬛⬛⬛⬛⬛⬛⬛⬛
⬛⬜⬜⬜⬜⬜⬜⬛
⬛⬜⬛⬜⬛⬛⬜⬛
⬛⬛⬜⬜⬛⬛⬜⬛
⬛⬜⬜⬜⬜⬜⬛⬛
⬛⬛⬜⬛⬛⬜⬜⬛
⬛⬜⬛⬜⬜⬜⬜⬛
⬛⬛⬛⬛⬛⬛⬛⬛外枠(黒い縁):検出しやすくするための「囲い」
内側のグリッド:白と黒のマス(5×5 など)が並び、これがID情報になります
なぜID番号が分かるの?
IDは「白黒のパターン」で表現されている!
- 内側の 5×5 マス(25ビット)の白黒パターンが、そのまま 2進数(ビット列)として使われます。
たとえば、次のようなデータとします:
黒=1、白=0
[1, 0, 0, 1, 0],
[0, 1, 1, 0, 1],
[1, 0, 1, 0, 0],
[0, 0, 1, 1, 0],
[1, 0, 1, 1, 1]]このデータを1列に並べると、10010 01101 10100 00110 10111 → 2進数 → 10進数に変換 → ID: 187543
OpenCVのarucoライブラリはこう動く:
- aruco.detectMarkers()でマーカーの画像を検出
- aruco.Dictionary_ get(aruco.DICT_4x4_50)などで、既知のID一覧と照合
- 一番近い一致を見つけて「これはID 23のマーカーだ」と判定します
ARマーカーの全体(8×8)
⬜ ⬛ ⬜ ⬛ ⬛
⬜ ⬜ ⬛ ⬛ ⬜
⬜ ⬜ ⬜ ⬜ ⬛
⬜ ⬛ ⬛ ⬜ ⬜
⬛ ⬜ ⬜ ⬜ ⬜黒=1、白=0に変換すると:
[0, 1, 0, 1, 1],
[0, 0, 1, 1, 0],
[0, 0, 0, 0, 1],
[0, 1, 1, 0, 0],
[1, 0, 0, 0, 0]行ごとに2進数 → 10進数で見てみると:
行 2進数 10進数 1 01011 11 2 00110 6 3 00001 1 4 01100 12 5 10000 16 最終的なIDは?
多くのARマーカー(例:ArUco)では、5×5の白黒ビットを1列に並べて1つの値に変換してIDにします。
コピーする編集するビット列を1行ずつ連結:
0101100110000010110010000
→ これは 2進数:0101100110000010110010000
→ 10進数に変換すると:290576ID番号「1」のマーカー画像を作って、印刷したり表示するには!
- **マーカーの種類(辞書)**を選ぶ
例:DUCT_4x4_50(4×4ビット、50種類のIDがある) - 作りたいID番号
今回は ID = 1
Python + OpenCV で作る方法
以下のPythonコードを使えば、ID=1のマーカー画像を簡単に作れます。
import cv2 import cv2.aruco as aruco # マーカー辞書(4x4の50種類のうちの1つ) aruco_dict = aruco.getPredefinedDictionary(aruco.DICT_4X4_50) # ID=1 のマーカーを 200x200ピクセルで生成 marker_image = aruco.drawMarker(aruco_dict, id=1, sidePixels=200) # 画像として保存 cv2.imwrite("aruco_id1.png", marker_image) # 表示(任意) cv2.imshow("AR Marker - ID 1", marker_image) cv2.waitKey(0) cv2.destroyAllWindows()使い方
- aruco_id1.png というファイルができます。
- 印刷したり、スマホやタブレットに表示したりできます。
- カメラで読み取ると、「これは ID=1 のマーカーだ!」と検出されます。
定義されている辞書を使って dictionary オブジェクトを作ります。どの「辞書」を使うべき?
辞書名 特徴 ID数 DICT_4X4_50 小さくて読みやすい 50種類のID DICT_5X5_100 中規模 100種類のID DICT_6X6_250 精度高い 250種類のID DICT_7X7_1000 非常に高精度 1000種類のID import cv2 import cv2.aruco as aruco import numpy as np import socket, threading, time import pygamecv2: OpenCVで映像処理をするためのライブラリ。aruco: ArUcoマーカーの検出に使います。
numpy: 数学的計算(座標計算など)に使います。
socket, threading, time:ドローンとの通信やスレッド処理に使います。
pygame: 効果音を鳴らすために使います。
aruco_dict = aruco.getPredefinedDictionary(aruco.DICT_4X4_50) parameters = aruco.DetectorParameters()50種類の4×4のArUcoマーカーを使うと指定。
検出時の細かい動作設定を初期化。
host = '0.0.0.0' port = 8889 tello_addr = ('192.168.10.1', 8889) sock = socket.socket(socket.AF_INET, socket.SOCK_DGRAM) sock.bind((host, port))- PCがTelloからの命令を受け取るためのネットワーク設定です。
UDPで送受信を行います。
def recv(): while True: try: data, _ = sock.recvfrom(1518) print(data.decode('utf-8')) except: break- ドローンからの返答を常に受け取って表示するための関数です。
threading.Thread(target=recv, daemon=True).start()recvを別スレッドで実行。メインの映像処理に影響を与えないようにします。def send(cmd, delay=1): sock.sendto(cmd.encode(), tello_addr) print(f">>> {cmd}") time.sleep(delay)ドローンにコマンド(例:takeoffやlandなど)を送信します。
待ち時間を入れることで安定動作を図っています。
send('command') send('streamon') cap = cv2.VideoCapture("udp://192.168.10.1:11111")ドローンを「SDKモード」にして、映像ストリーミングを開始。
UDPでカメラ映像を受信できるように設定。
pygame.mixer.init() point_sound = pygame.mixer.Sound("point.wav")Pygameで音を鳴らす準備。
“point.wav”という音ファイルをロード。
def play_point_sound(): point_sound.stop() point_sound.play()効果音を毎回初めから再生する関数。
def draw_star(img, center, size, color, thickness):星の形を描きます(5つの点で構成)。
score = 0 passed = set() MARKERS = { 0: 'star_floor', ... } DESIRED_HEIGHT_CM = 90得点の初期値。
すでに通過したマーカーを記録するセット。
各マーカーIDに対応する図形名。
全ての図形を90cmの高さに表示する設定。
while True: ret, frame = cap.read() if not ret: continueドローンの映像を1フレームずつ取得。
gray = cv2.cvtColor(frame, cv2.COLOR_BGR2GRAY) corners, ids, _ = aruco.detectMarkers(gray, aruco_dict, parameters=parameters)映像をグレースケールにして、マーカーを検出。
frame_center = (frame.shape[1] // 2, frame.shape[0] // 2)画面の中心座標を計算。
ここからは、「マーカーの場所を見つけて、その上に指定した高さで、指定した図形を画面上に描くための座標計算」をしています。
if ids is not None: for idx, i in enumerate(ids.flatten()): c = corners[idx][0] cx, cy = int(c[:, 0].mean()), int(c[:, 1].mean()) size_px = np.linalg.norm(c[0] - c[2]) cm_per_px = size_px / 21.0 shape = MARKERS.get(i, 'unknown') size = int(25 * cm_per_px) offset_y = int(-DESIRED_HEIGHT_CM * cm_per_px) cy_offset = cy + offset_y cy_offset = max(0, min(frame.shape[0] - 1, cy_offset)) center_pos = (cx, cy_offset)Telloのカメラに映ったArUcoマーカーを見つけたあとに、図形を描画する中心座標を計算する処理です。
マーカーが見つかっていれば、1つずつ処理。
if ids is not None:aruco.detectMarkers()でマーカーが1つでも見つかったときに入る条件です。
idsは見つかったマーカーのIDの配列です(例:array([[0], [3], [5]])など)for idx, i in enumerate(ids.flatten()):- idsは2次元配列なのでflatten()で1次元にします。
- idxは見つかったマーカーの順番(0番目、1番目…)。
- iは実際のマーカーID(たとえば 0, 3, 5 など)。
c = corners[idx][0]cornersはマーカーの角の座標リスト。
たとえば 4つの点 (x, y) の座標が入っており、
cはそのマーカーの4点の座標です。
例:[(x1, y1), (x2, y2), (x3, y3), (x4, y4)]cx, cy = int(c[:, 0].mean()), int(c[:, 1].mean())マーカーの中心座標を求めています。
c[:, 0]はすべてのx座標、c[:, 1]はすべてのy座標。それぞれの平均を取ることで、マーカーの中心が求まります。
size_px = np.linalg.norm(c[0] - c[2])マーカーの大きさ(ピクセル)を測ります。
対角線の長さ(点0と点2の距離)を使っています。
np.linalg.norm は2点間のユークリッド距離(直線距離)を出す関数です。
cm_per_px = size_px / 21.0ArUcoマーカーの実際のサイズは21cmと仮定。
1ピクセルが何cmかを換算しています。
(例:マーカーが画像上で105ピクセルなら 105 / 21 = 5 px/cm)shape = MARKERS.get(i, 'unknown')マーカーID
iに対して、どの図形を描くかをMARKERS辞書から取得。見つからない場合は
'unknown'とします。size = int(25 * cm_per_px)描画する図形のサイズを決定。
ここでは実世界で「25cmサイズの図形」を想定し、ピクセルに変換。
offset_y = int(-DESIRED_HEIGHT_CM * cm_per_px)図形を「マーカーの上空●cmの高さ」に表示するためのY方向の補正量。
DESIRED_HEIGHT_CM = 90 の場合、上に90cm分図形をずらすという意味です。
マイナスにしているのは「上方向に移動する」ため。
cy_offset = cy + offset_yマーカーの中心
cyにオフセットを加えて、図形のY座標を上方にずらします。cy_offset = max(0, min(frame.shape[0] - 1, cy_offset))図形のY座標が画面の範囲(0 ~ 高さ)からはみ出さないように調整。
max(0, …) → 画面上に出すぎないようにする
min(frame.shape[0] – 1, …) → 画面下に出すぎないようにする
center_pos = (cx, cy_offset)最終的に図形を描画する中心位置を
(x, y)のタプルで保存します。cx, cy = int(c[:, 0].mean()), int(c[:, 1].mean())マーカーの中心座標。
size_px = np.linalg.norm(c[0] - c[2]) cm_per_px = size_px / 21.0マーカーのサイズから、ピクセルとcmの換算率を出します。
offset_y = int(-DESIRED_HEIGHT_CM * cm_per_px)地面から90cm上に表示するためのY方向の補正。
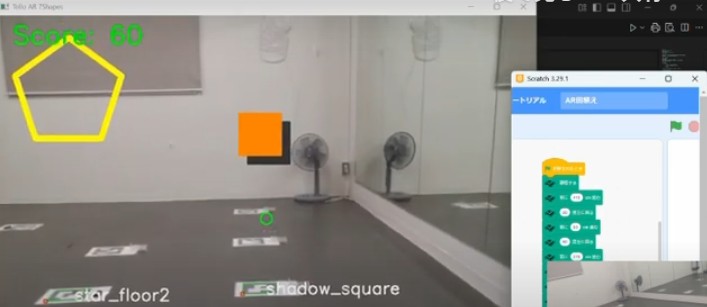
if shape == 'star_floor' or shape == 'star_floor2': draw_star(frame, center_pos, size, (0, 255, 255), thickness=10) elif shape == 'pentagon' or shape == 'pentagon2': draw_polygon(frame, center_pos, size, 5, (255, 0, 0), thickness=10) elif shape == 'circle': draw_circle(frame, center_pos, size, (0, 0, 255), thickness=10) elif shape == 'triangle': draw_polygon(frame, center_pos, size, 3, (0, 255, 0), thickness=10) elif shape == 'star_vertical': draw_star(frame, center_pos, size, (0, 165, 255), thickness=10) elif shape == 'pyramid': draw_pyramid(frame, center_pos, size) elif shape == 'cube_transparent': draw_transparent_cube(frame, center_pos, size) elif shape == 'shadow_square': draw_shadowed_square(frame, center_pos, size)- マーカーの種類に応じて対応する図形を描画。
distance = np.hypot(cx - frame_center[0], cy - frame_center[1])マーカーの中心と画面中心の距離。
if distance < 100 and marker_key not in passed: score += 10 passed.add(marker_key) play_point_sound()- 接触(100px以内)していれば、得点+音。
if marker_key in passed: cv2.putText(frame, "X", ...)すでに通過したマーカーには「X」を描く。
cv2.putText(frame, f"Score: {score}", ...) cv2.imshow("Tello AR 7Shapes", frame) if cv2.waitKey(1) == 27: breakスコアを表示。
ウィンドウで映像を表示し、Escキーで終了。
いろいろな図形の描き方
星を描く draw_star
def draw_star(img, center, size, color, thickness): pts = [] cx, cy = center for i in range(5): angle = np.pi / 2 + i * 2 * np.pi / 5 pts.append((int(cx + size * np.cos(angle)), int(cy - size * np.sin(angle)))) cv2.polylines(img, [np.array(pts)], True, color, thickness)中心座標 (center) から放射状に5つの点を計算
三角関数 cos と sin を使って「星形の外側の点」を決める
cv2.polylines でその5点を線で結ぶ
多角形を描く draw_polygon
def draw_polygon(img, center, size, sides, color, thickness): pts = [] cx, cy = center for i in range(sides): angle = np.pi / 2 + i * 2 * np.pi / sides pts.append((int(cx + size * np.cos(angle)), int(cy - size * np.sin(angle)))) cv2.polylines(img, [np.array(pts)], True, color, thickness)中心から
sides(辺の数)分の頂点を計算して、線で結ぶ例えば
sides=3→ 三角形、sides=6→ 六角形星と同じ仕組みですが、頂点の数を自由に指定できます
円を描く draw_circle
def draw_circle(img, center, size, color, thickness): cv2.circle(img, center, int(size), color, thickness)cv2.circleを使って単純に円を描きますthickness=-1にすると塗りつぶしになります四角形 draw_shadowed_square
def draw_shadowed_square(img, center, size, square_color=(0, 128, 255), shadow_color=(50, 50, 50), thickness=4): cx, cy = center d = size // 2 offset = size // 5 # 影 shadow_pts = np.array([ (cx - d + offset, cy - d + offset), (cx + d + offset, cy - d + offset), (cx + d + offset, cy + d + offset), (cx - d + offset, cy + d + offset) ]) cv2.fillPoly(img, [shadow_pts], shadow_color) # 本体 square_pts = np.array([ (cx - d, cy - d), (cx + d, cy - d), (cx + d, cy + d), (cx - d, cy + d) ]) cv2.fillPoly(img, [square_pts], square_color)まず少しズラした位置に「影色の四角」を塗りつぶし
その上に本体の四角を重ねて、立体感を出しています
全体コード(Telloのカメラ映像にデジタル情報を重ねて表示しています。)
import cv2 import cv2.aruco as aruco import numpy as np import socket, threading, time import pygame # --- ArUco 設定 --- aruco_dict = aruco.getPredefinedDictionary(aruco.DICT_4X4_50) parameters = aruco.DetectorParameters() # --- 通信設定 --- host = '0.0.0.0' port = 8889 tello_addr = ('192.168.10.1', 8889) sock = socket.socket(socket.AF_INET, socket.SOCK_DGRAM) sock.bind((host, port)) def recv(): while True: try: data, _ = sock.recvfrom(1518) print(data.decode('utf-8')) except: break threading.Thread(target=recv, daemon=True).start() def send(cmd, delay=1): sock.sendto(cmd.encode(), tello_addr) print(f">>> {cmd}") time.sleep(delay) # --- Tello 飛行・映像 --- send('command') send('streamon') cap = cv2.VideoCapture("udp://192.168.10.1:11111") # --- 効果音の初期化 --- pygame.mixer.init() point_sound = pygame.mixer.Sound("point.wav") def play_point_sound(): point_sound.stop() point_sound.play() # --- 図形描画関数 --- def draw_star(img, center, size, color, thickness): pts = [] cx, cy = center for i in range(5): angle = np.pi / 2 + i * 2 * np.pi / 5 pts.append((int(cx + size * np.cos(angle)), int(cy - size * np.sin(angle)))) cv2.polylines(img, [np.array(pts)], True, color, thickness) def draw_polygon(img, center, size, sides, color, thickness): pts = [] cx, cy = center for i in range(sides): angle = np.pi / 2 + i * 2 * np.pi / sides pts.append((int(cx + size * np.cos(angle)), int(cy - size * np.sin(angle)))) cv2.polylines(img, [np.array(pts)], True, color, thickness) def draw_circle(img, center, size, color, thickness): cv2.circle(img, center, int(size), color, thickness) def draw_pyramid(img, center, size, color=(0, 200, 255), thickness=2): cx, cy = center d = size // 2 # 底面(三角) base = np.array([ (cx - d, cy + d), (cx + d, cy + d), (cx, cy - d) ]) # 頂点(上) apex = (cx, cy - int(size * 1.5)) # 三角面を線で描く for pt in base: cv2.line(img, apex, pt, color, thickness) cv2.polylines(img, [base], isClosed=True, color=color, thickness=thickness) def draw_transparent_cube(img, center, size, color=(200, 255, 200), thickness=2): cx, cy = center d = size // 2 offset = size // 3 front = np.array([ (cx - d, cy - d), (cx + d, cy - d), (cx + d, cy + d), (cx - d, cy + d) ]) back = np.array([ (cx - d + offset, cy - d - offset), (cx + d + offset, cy - d - offset), (cx + d + offset, cy + d - offset), (cx - d + offset, cy + d - offset) ]) for i in range(4): cv2.line(img, front[i], front[(i+1)%4], color, thickness) cv2.line(img, back[i], back[(i+1)%4], color, thickness) cv2.line(img, front[i], back[i], color, thickness) def draw_shadowed_square(img, center, size, square_color=(0, 128, 255), shadow_color=(50, 50, 50), thickness=4): cx, cy = center d = size // 2 offset = size // 5 # 影を描画 shadow_pts = np.array([ (cx - d + offset, cy - d + offset), (cx + d + offset, cy - d + offset), (cx + d + offset, cy + d + offset), (cx - d + offset, cy + d + offset) ]) cv2.fillPoly(img, [shadow_pts], shadow_color) # 正方形本体 square_pts = np.array([ (cx - d, cy - d), (cx + d, cy - d), (cx + d, cy + d), (cx - d, cy + d) ]) cv2.fillPoly(img, [square_pts], square_color) # --- メインループ変数 --- score = 0 passed = set() MARKERS = { 0: 'star_floor', 1: 'pentagon', 2: 'circle', 3: 'triangle', 4: 'star_vertical', 5: 'star_floor2', 6: 'pentagon2', 7: 'pyramid', 8: 'cube_transparent', 9: 'shadow_square' } DESIRED_HEIGHT_CM = 90 # --- メインループ --- while True: ret, frame = cap.read() if not ret: continue gray = cv2.cvtColor(frame, cv2.COLOR_BGR2GRAY) corners, ids, _ = aruco.detectMarkers(gray, aruco_dict, parameters=parameters) frame_center = (frame.shape[1] // 2, frame.shape[0] // 2) cv2.circle(frame, frame_center, 10, (0, 255, 0), 2) if ids is not None: for idx, i in enumerate(ids.flatten()): c = corners[idx][0] cx, cy = int(c[:, 0].mean()), int(c[:, 1].mean()) size_px = np.linalg.norm(c[0] - c[2]) cm_per_px = size_px / 21.0 shape = MARKERS.get(i, 'unknown') size = int(25 * cm_per_px) offset_y = int(-DESIRED_HEIGHT_CM * cm_per_px) cy_offset = cy + offset_y cy_offset = max(0, min(frame.shape[0] - 1, cy_offset)) center_pos = (cx, cy_offset) # 図形描画 if shape == 'star_floor' or shape == 'star_floor2': draw_star(frame, center_pos, size, (0, 255, 255), thickness=10) elif shape == 'pentagon' or shape == 'pentagon2': draw_polygon(frame, center_pos, size, 5, (255, 0, 0), thickness=10) elif shape == 'circle': draw_circle(frame, center_pos, size, (0, 0, 255), thickness=10) elif shape == 'triangle': draw_polygon(frame, center_pos, size, 3, (0, 255, 0), thickness=10) elif shape == 'star_vertical': draw_star(frame, center_pos, size, (0, 165, 255), thickness=10) elif shape == 'pyramid': draw_pyramid(frame, center_pos, size) elif shape == 'cube_transparent': draw_transparent_cube(frame, center_pos, size) elif shape == 'shadow_square': draw_shadowed_square(frame, center_pos, size) aruco.drawDetectedMarkers(frame, corners) cv2.putText(frame, shape, (cx + 10, cy + 10), cv2.FONT_HERSHEY_SIMPLEX, 1, (255, 255, 255), 2) # --- 接触判定とX表示 --- distance = np.hypot(cx - frame_center[0], cy - frame_center[1]) marker_key = (i, cx, cy) if distance < 100 and marker_key not in passed: score += 10 passed.add(marker_key) play_point_sound() print(f"Hit marker {i}! +10 points. Score: {score}") # 通過済みマーカーには常にXを表示 if marker_key in passed: cv2.putText(frame, "X", (center_pos[0] - 20, center_pos[1] + 20), cv2.FONT_HERSHEY_SIMPLEX, 2.0, (0, 0, 255), 5) # スコア表示 cv2.putText(frame, f"Score: {score}", (30, 50), cv2.FONT_HERSHEY_SIMPLEX, 1.5, (0, 255, 0), 3) cv2.imshow("Tello AR 7Shapes", frame) if cv2.waitKey(1) == 27: break # --- 終了処理 --- send('land') cap.release() cv2.destroyAllWindows()このエラーメッセージは WordPress の管理者にだけ表示されます
エラー: 接続されたアカウントがありません。
アカウントを接続するには、YouTube Feeds の設定ページに移動してください。
- Download and use