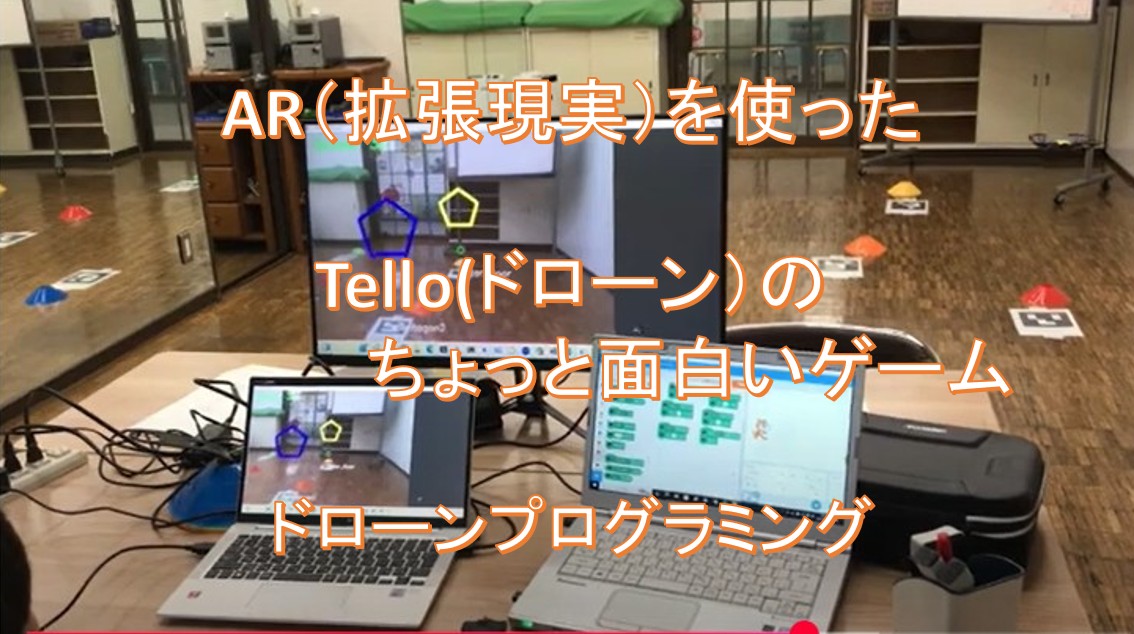
OpenCVのArUcoマーカーの検出で構築。AR(拡張現実)(Augmented Reality)とは、現実世界にデジタル情報を重ねて表示し、現実を拡張する技術のことです。
マーカー型は、実在の場所に配置された図形(マーカー)をカメラなどで読み取り、マーカーに合わせてデジタル情報を配置します。実際にマーカーを用意する手間がかかるものの、技術的にはシンプルで場所を選ばず比較的自由に表示できることが特徴です。
ここでは、マーカー型を動画のように使ってやっていきます。
カメラで白黒マーカーを見たとき、コンピュータは次のステップで認識しています。
【ステップ1】白と黒のパターンを見つける
- 画像の中で「黒い四角に囲まれた白い領域」を探します。
- これは、マーカーの外枠(四角い黒いフチ)です。
【ステップ2】四隅の座標を見つける
- 見つけた四角の「4つの角」を検出して、カメラから見た「角度・向き」を計算します。
【ステップ3】中身のパターンを読む
- 中の白黒のグリッド(マス目)を読み取り、それがどのIDに当たるか、**辞書(dictionary)**と照らし合わせて確認します。
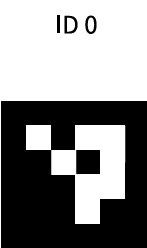
ARマーカーの構造
⬛⬛⬛⬛⬛⬛⬛⬛
⬛⬜⬜⬜⬜⬜⬜⬛
⬛⬜⬛⬜⬛⬛⬜⬛
⬛⬛⬜⬜⬛⬛⬜⬛
⬛⬜⬜⬜⬜⬜⬛⬛
⬛⬛⬜⬛⬛⬜⬜⬛
⬛⬜⬛⬜⬜⬜⬜⬛
⬛⬛⬛⬛⬛⬛⬛⬛
外枠(黒い縁):検出しやすくするための「囲い」
内側のグリッド:白と黒のマス(5×5 など)が並び、これがID情報になります
なぜID番号が分かるの?
IDは「白黒のパターン」で表現されている!
- 内側の 5×5 マス(25ビット)の白黒パターンが、そのまま 2進数(ビット列)として使われます。
たとえば、次のようなデータとします:
黒=1、白=0
[1, 0, 0, 1, 0],
[0, 1, 1, 0, 1],
[1, 0, 1, 0, 0],
[0, 0, 1, 1, 0],
[1, 0, 1, 1, 1]]
このデータを1列に並べると、10010 01101 10100 00110 10111 → 2進数 → 10進数に変換 → ID: 187543
OpenCVのarucoライブラリはこう動く:
- aruco.detectMarkers()でマーカーの画像を検出
- aruco.Dictionary_ get(aruco.DICT_4x4_50)などで、既知のID一覧と照合
- 一番近い一致を見つけて「これはID 23のマーカーだ」と判定します
ARマーカーの全体(8×8)
⬜ ⬛ ⬜ ⬛ ⬛
⬜ ⬜ ⬛ ⬛ ⬜
⬜ ⬜ ⬜ ⬜ ⬛
⬜ ⬛ ⬛ ⬜ ⬜
⬛ ⬜ ⬜ ⬜ ⬜
黒=1、白=0に変換すると:
[0, 1, 0, 1, 1],
[0, 0, 1, 1, 0],
[0, 0, 0, 0, 1],
[0, 1, 1, 0, 0],
[1, 0, 0, 0, 0]
行ごとに2進数 → 10進数で見てみると:
| 行 | 2進数 | 10進数 |
|---|---|---|
| 1 | 01011 | 11 |
| 2 | 00110 | 6 |
| 3 | 00001 | 1 |
| 4 | 01100 | 12 |
| 5 | 10000 | 16 |
最終的なIDは?
多くのARマーカー(例:ArUco)では、5×5の白黒ビットを1列に並べて1つの値に変換してIDにします。
コピーする編集するビット列を1行ずつ連結:
0101100110000010110010000
→ これは 2進数:0101100110000010110010000
→ 10進数に変換すると:290576
ID番号「1」のマーカー画像を作って、印刷したり表示するには!
- **マーカーの種類(辞書)**を選ぶ
例:DUCT_4x4_50(4×4ビット、50種類のIDがある) - 作りたいID番号
今回は ID = 1
Python + OpenCV で作る方法
以下のPythonコードを使えば、ID=1のマーカー画像を簡単に作れます。
import cv2
import cv2.aruco as aruco

# マーカー辞書(4x4の50種類のうちの1つ)
aruco_dict = aruco.getPredefinedDictionary(aruco.DICT_4X4_50)

# ID=1 のマーカーを 200x200ピクセルで生成
marker_image = aruco.drawMarker(aruco_dict, id=1, sidePixels=200)

# 画像として保存
cv2.imwrite("aruco_id1.png", marker_image)

# 表示(任意)
cv2.imshow("AR Marker - ID 1", marker_image)
cv2.waitKey(0)
cv2.destroyAllWindows()
使い方
- aruco_id1.png というファイルができます。
- 印刷したり、スマホやタブレットに表示したりできます。
- カメラで読み取ると、「これは ID=1 のマーカーだ!」と検出されます。
定義されている辞書を使って dictionary オブジェクトを作ります。どの「辞書」を使うべき?
| 辞書名 | 特徴 | ID数 |
|---|---|---|
| DICT_4X4_50 | 小さくて読みやすい | 50種類のID |
| DICT_5X5_100 | 中規模 | 100種類のID |
| DICT_6X6_250 | 精度高い | 250種類のID |
| DICT_7X7_1000 | 非常に高精度 | 1000種類のID |
import cv2
import cv2.aruco as aruco
import numpy as np
import socket, threading, time
import pygame
cv2: OpenCVで映像処理をするためのライブラリ。
aruco: ArUcoマーカーの検出に使います。
numpy: 数学的計算(座標計算など)に使います。
socket, threading, time:ドローンとの通信やスレッド処理に使います。
pygame: 効果音を鳴らすために使います。
aruco_dict = aruco.getPredefinedDictionary(aruco.DICT_4X4_50)
parameters = aruco.DetectorParameters()
50種類の4×4のArUcoマーカーを使うと指定。
検出時の細かい動作設定を初期化。
host = '0.0.0.0'
port = 8889
tello_addr = ('192.168.10.1', 8889)
sock = socket.socket(socket.AF_INET, socket.SOCK_DGRAM)
sock.bind((host, port))
- PCがTelloからの命令を受け取るためのネットワーク設定です。
UDPで送受信を行います。
def recv():
while True:
try:
data, _ = sock.recvfrom(1518)
print(data.decode('utf-8'))
except:
break
- ドローンからの返答を常に受け取って表示するための関数です。
threading.Thread(target=recv, daemon=True).start()
recvを別スレッドで実行。メインの映像処理に影響を与えないようにします。
def send(cmd, delay=1):
sock.sendto(cmd.encode(), tello_addr)
print(f">>> {cmd}")
time.sleep(delay)
ドローンにコマンド(例:takeoffやlandなど)を送信します。
待ち時間を入れることで安定動作を図っています。
send('command')
send('streamon')
cap = cv2.VideoCapture("udp://192.168.10.1:11111")
ドローンを「SDKモード」にして、映像ストリーミングを開始。
UDPでカメラ映像を受信できるように設定。
pygame.mixer.init()
point_sound = pygame.mixer.Sound("point.wav")
Pygameで音を鳴らす準備。
“point.wav”という音ファイルをロード。
def play_point_sound():
point_sound.stop()
point_sound.play()
効果音を毎回初めから再生する関数。
def draw_star(img, center, size, color, thickness):星の形を描きます(5つの点で構成)。
score = 0
passed = set()
MARKERS = {
0: 'star_floor', ...
}
DESIRED_HEIGHT_CM = 90
得点の初期値。
すでに通過したマーカーを記録するセット。
各マーカーIDに対応する図形名。
全ての図形を90cmの高さに表示する設定。
while True:
ret, frame = cap.read()
if not ret:
continue
ドローンの映像を1フレームずつ取得。
gray = cv2.cvtColor(frame, cv2.COLOR_BGR2GRAY)
corners, ids, _ = aruco.detectMarkers(gray, aruco_dict, parameters=parameters)
映像をグレースケールにして、マーカーを検出。
frame_center = (frame.shape[1] // 2, frame.shape[0] // 2)
画面の中心座標を計算。
ここからは、「マーカーの場所を見つけて、その上に指定した高さで、指定した図形を画面上に描くための座標計算」をしています。
if ids is not None:
for idx, i in enumerate(ids.flatten()):
c = corners[idx][0]
cx, cy = int(c[:, 0].mean()), int(c[:, 1].mean())
size_px = np.linalg.norm(c[0] - c[2])
cm_per_px = size_px / 21.0
shape = MARKERS.get(i, 'unknown')
size = int(25 * cm_per_px)
offset_y = int(-DESIRED_HEIGHT_CM * cm_per_px)
cy_offset = cy + offset_y
cy_offset = max(0, min(frame.shape[0] - 1, cy_offset))
center_pos = (cx, cy_offset)
Telloのカメラに映ったArUcoマーカーを見つけたあとに、図形を描画する中心座標を計算する処理です。
マーカーが見つかっていれば、1つずつ処理。
if ids is not None:
aruco.detectMarkers()でマーカーが1つでも見つかったときに入る条件です。
ids は見つかったマーカーのIDの配列です(例:array([[0], [3], [5]])など)
for idx, i in enumerate(ids.flatten()):
- idsは2次元配列なのでflatten()で1次元にします。
- idxは見つかったマーカーの順番(0番目、1番目…)。
- iは実際のマーカーID(たとえば 0, 3, 5 など)。
c = corners[idx][0]
cornersはマーカーの角の座標リスト。
たとえば 4つの点 (x, y) の座標が入っており、c はそのマーカーの4点の座標です。
例:[(x1, y1), (x2, y2), (x3, y3), (x4, y4)]
cx, cy = int(c[:, 0].mean()), int(c[:, 1].mean())
マーカーの中心座標を求めています。
c[:, 0] はすべてのx座標、c[:, 1] はすべてのy座標。
それぞれの平均を取ることで、マーカーの中心が求まります。
size_px = np.linalg.norm(c[0] - c[2])
マーカーの大きさ(ピクセル)を測ります。
対角線の長さ(点0と点2の距離)を使っています。
np.linalg.norm は2点間のユークリッド距離(直線距離)を出す関数です。
cm_per_px = size_px / 21.0
ArUcoマーカーの実際のサイズは21cmと仮定。
1ピクセルが何cmかを換算しています。
(例:マーカーが画像上で105ピクセルなら 105 / 21 = 5 px/cm)
shape = MARKERS.get(i, 'unknown')
マーカーID i に対して、どの図形を描くかを MARKERS 辞書から取得。
見つからない場合は 'unknown' とします。
size = int(25 * cm_per_px)
描画する図形のサイズを決定。
ここでは実世界で「25cmサイズの図形」を想定し、ピクセルに変換。
offset_y = int(-DESIRED_HEIGHT_CM * cm_per_px)
図形を「マーカーの上空●cmの高さ」に表示するためのY方向の補正量。
DESIRED_HEIGHT_CM = 90 の場合、上に90cm分図形をずらすという意味です。
マイナスにしているのは「上方向に移動する」ため。
cy_offset = cy + offset_y
マーカーの中心 cy にオフセットを加えて、図形のY座標を上方にずらします。
cy_offset = max(0, min(frame.shape[0] - 1, cy_offset))
図形のY座標が画面の範囲(0 ~ 高さ)からはみ出さないように調整。
max(0, …) → 画面上に出すぎないようにする
min(frame.shape[0] – 1, …) → 画面下に出すぎないようにする
center_pos = (cx, cy_offset)
最終的に図形を描画する中心位置を (x, y) のタプルで保存します。
cx, cy = int(c[:, 0].mean()), int(c[:, 1].mean())
マーカーの中心座標。
size_px = np.linalg.norm(c[0] - c[2])
cm_per_px = size_px / 21.0
マーカーのサイズから、ピクセルとcmの換算率を出します。
offset_y = int(-DESIRED_HEIGHT_CM * cm_per_px)
地面から90cm上に表示するためのY方向の補正。
if shape == 'star_floor' or shape == 'star_floor2':
draw_star(frame, center_pos, size, (0, 255, 255), thickness=10)
elif shape == 'pentagon' or shape == 'pentagon2':
draw_polygon(frame, center_pos, size, 5, (255, 0, 0), thickness=10)
elif shape == 'circle':
draw_circle(frame, center_pos, size, (0, 0, 255), thickness=10)
elif shape == 'triangle':
draw_polygon(frame, center_pos, size, 3, (0, 255, 0), thickness=10)
elif shape == 'star_vertical':
draw_star(frame, center_pos, size, (0, 165, 255), thickness=10)
elif shape == 'pyramid':
draw_pyramid(frame, center_pos, size)
elif shape == 'cube_transparent':
draw_transparent_cube(frame, center_pos, size)
elif shape == 'shadow_square':
draw_shadowed_square(frame, center_pos, size)
- マーカーの種類に応じて対応する図形を描画。
distance = np.hypot(cx - frame_center[0], cy - frame_center[1])
マーカーの中心と画面中心の距離。
if distance < 100 and marker_key not in passed:
score += 10
passed.add(marker_key)
play_point_sound()
- 接触(100px以内)していれば、得点+音。
if marker_key in passed:
cv2.putText(frame, "X", ...)
すでに通過したマーカーには「X」を描く。
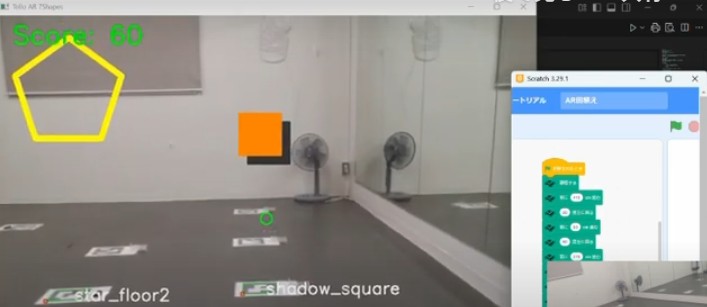
cv2.putText(frame, f"Score: {score}", ...)
cv2.imshow("Tello AR 7Shapes", frame)
if cv2.waitKey(1) == 27:
break
スコアを表示。
ウィンドウで映像を表示し、Escキーで終了。
いろいろな図形の描き方
星を描く draw_star
def draw_star(img, center, size, color, thickness):
pts = []
cx, cy = center
for i in range(5):
angle = np.pi / 2 + i * 2 * np.pi / 5
pts.append((int(cx + size * np.cos(angle)), int(cy - size * np.sin(angle))))
cv2.polylines(img, [np.array(pts)], True, color, thickness)
中心座標 (center) から放射状に5つの点を計算
三角関数 cos と sin を使って「星形の外側の点」を決める
cv2.polylines でその5点を線で結ぶ
多角形を描く draw_polygon
def draw_polygon(img, center, size, sides, color, thickness):
pts = []
cx, cy = center
for i in range(sides):
angle = np.pi / 2 + i * 2 * np.pi / sides
pts.append((int(cx + size * np.cos(angle)), int(cy - size * np.sin(angle))))
cv2.polylines(img, [np.array(pts)], True, color, thickness)
中心から sides(辺の数)分の頂点を計算して、線で結ぶ
例えば sides=3 → 三角形、sides=6 → 六角形
星と同じ仕組みですが、頂点の数を自由に指定できます
円を描く draw_circle
def draw_circle(img, center, size, color, thickness):
cv2.circle(img, center, int(size), color, thickness)
cv2.circle を使って単純に円を描きます
thickness=-1 にすると塗りつぶしになります
四角形 draw_shadowed_square
def draw_shadowed_square(img, center, size, square_color=(0, 128, 255), shadow_color=(50, 50, 50), thickness=4):
cx, cy = center
d = size // 2
offset = size // 5
# 影
shadow_pts = np.array([
(cx - d + offset, cy - d + offset),
(cx + d + offset, cy - d + offset),
(cx + d + offset, cy + d + offset),
(cx - d + offset, cy + d + offset)
])
cv2.fillPoly(img, [shadow_pts], shadow_color)
# 本体
square_pts = np.array([
(cx - d, cy - d),
(cx + d, cy - d),
(cx + d, cy + d),
(cx - d, cy + d)
])
cv2.fillPoly(img, [square_pts], square_color)
まず少しズラした位置に「影色の四角」を塗りつぶし
その上に本体の四角を重ねて、立体感を出しています
全体コード(Telloのカメラ映像にデジタル情報を重ねて表示しています。)
import cv2
import cv2.aruco as aruco
import numpy as np
import socket, threading, time
import pygame
# --- ArUco 設定 ---
aruco_dict = aruco.getPredefinedDictionary(aruco.DICT_4X4_50)
parameters = aruco.DetectorParameters()
# --- 通信設定 ---
host = '0.0.0.0'
port = 8889
tello_addr = ('192.168.10.1', 8889)
sock = socket.socket(socket.AF_INET, socket.SOCK_DGRAM)
sock.bind((host, port))
def recv():
    while True:
        try:
            data, _ = sock.recvfrom(1518)
            print(data.decode('utf-8'))
        except:
            break
threading.Thread(target=recv, daemon=True).start()
def send(cmd, delay=1):
    sock.sendto(cmd.encode(), tello_addr)
    print(f">>> {cmd}")
    time.sleep(delay)
# --- Tello 飛行・映像 ---
send('command')
send('streamon')
cap = cv2.VideoCapture("udp://192.168.10.1:11111")
# --- 効果音の初期化 ---
pygame.mixer.init()
point_sound = pygame.mixer.Sound("point.wav")
def play_point_sound():
    point_sound.stop()
    point_sound.play()
# --- 図形描画関数 ---
def draw_star(img, center, size, color, thickness):
pts = []
cx, cy = center
for i in range(5):
angle = np.pi / 2 + i * 2 * np.pi / 5
pts.append((int(cx + size * np.cos(angle)), int(cy - size * np.sin(angle))))
cv2.polylines(img, [np.array(pts)], True, color, thickness)
def draw_polygon(img, center, size, sides, color, thickness):
pts = []
cx, cy = center
for i in range(sides):
angle = np.pi / 2 + i * 2 * np.pi / sides
pts.append((int(cx + size * np.cos(angle)), int(cy - size * np.sin(angle))))
cv2.polylines(img, [np.array(pts)], True, color, thickness)
def draw_circle(img, center, size, color, thickness):
cv2.circle(img, center, int(size), color, thickness)
def draw_pyramid(img, center, size, color=(0, 200, 255), thickness=2):
cx, cy = center
d = size // 2
# 底面(三角)
base = np.array([
(cx - d, cy + d),
(cx + d, cy + d),
(cx, cy - d)
])
# 頂点(上)
apex = (cx, cy - int(size * 1.5))
# 三角面を線で描く
for pt in base:
cv2.line(img, apex, pt, color, thickness)
cv2.polylines(img, [base], isClosed=True, color=color, thickness=thickness)
def draw_transparent_cube(img, center, size, color=(200, 255, 200), thickness=2):
cx, cy = center
d = size // 2
offset = size // 3
front = np.array([
(cx - d, cy - d),
(cx + d, cy - d),
(cx + d, cy + d),
(cx - d, cy + d)
])
back = np.array([
(cx - d + offset, cy - d - offset),
(cx + d + offset, cy - d - offset),
(cx + d + offset, cy + d - offset),
(cx - d + offset, cy + d - offset)
])
for i in range(4):
cv2.line(img, front[i], front[(i+1)%4], color, thickness)
cv2.line(img, back[i], back[(i+1)%4], color, thickness)
cv2.line(img, front[i], back[i], color, thickness)
def draw_shadowed_square(img, center, size, square_color=(0, 128, 255), shadow_color=(50, 50, 50), thickness=4):
cx, cy = center
d = size // 2
offset = size // 5
# 影を描画
shadow_pts = np.array([
(cx - d + offset, cy - d + offset),
(cx + d + offset, cy - d + offset),
(cx + d + offset, cy + d + offset),
(cx - d + offset, cy + d + offset)
])
cv2.fillPoly(img, [shadow_pts], shadow_color)
# 正方形本体
square_pts = np.array([
(cx - d, cy - d),
(cx + d, cy - d),
(cx + d, cy + d),
(cx - d, cy + d)
])
cv2.fillPoly(img, [square_pts], square_color)
# --- メインループ変数 ---
score = 0
passed = set()
MARKERS = {
0: 'star_floor',
1: 'pentagon',
2: 'circle',
3: 'triangle',
4: 'star_vertical',
5: 'star_floor2',
6: 'pentagon2',
7: 'pyramid',
8: 'cube_transparent',
9: 'shadow_square'
}
DESIRED_HEIGHT_CM = 90
# --- メインループ ---
while True:
    ret, frame = cap.read()
    if not ret:
        continue
    gray = cv2.cvtColor(frame, cv2.COLOR_BGR2GRAY)
    corners, ids, _ = aruco.detectMarkers(gray, aruco_dict, parameters=parameters)
frame_center = (frame.shape[1] // 2, frame.shape[0] // 2)
cv2.circle(frame, frame_center, 10, (0, 255, 0), 2)
if ids is not None:
        for idx, i in enumerate(ids.flatten()):
            c = corners[idx][0]
            cx, cy = int(c[:, 0].mean()), int(c[:, 1].mean())
            size_px = np.linalg.norm(c[0] - c[2])
            cm_per_px = size_px / 21.0
            shape = MARKERS.get(i, 'unknown')
            size = int(25 * cm_per_px)

            offset_y = int(-DESIRED_HEIGHT_CM * cm_per_px)
            cy_offset = cy + offset_y
            cy_offset = max(0, min(frame.shape[0] - 1, cy_offset))
            center_pos = (cx, cy_offset)
# 図形描画
  if shape == 'star_floor' or shape == 'star_floor2':
                draw_star(frame, center_pos, size, (0, 255, 255), thickness=10)
            elif shape == 'pentagon' or shape == 'pentagon2':
                draw_polygon(frame, center_pos, size, 5, (255, 0, 0), thickness=10)
            elif shape == 'circle':
                draw_circle(frame, center_pos, size, (0, 0, 255), thickness=10)
            elif shape == 'triangle':
                draw_polygon(frame, center_pos, size, 3, (0, 255, 0), thickness=10)
            elif shape == 'star_vertical':
                draw_star(frame, center_pos, size, (0, 165, 255), thickness=10)
            elif shape == 'pyramid':
                draw_pyramid(frame, center_pos, size)
            elif shape == 'cube_transparent':
                draw_transparent_cube(frame, center_pos, size)
            elif shape == 'shadow_square':
                draw_shadowed_square(frame, center_pos, size)
aruco.drawDetectedMarkers(frame, corners)
cv2.putText(frame, shape, (cx + 10, cy + 10),
cv2.FONT_HERSHEY_SIMPLEX, 1, (255, 255, 255), 2)
# --- 接触判定とX表示 ---
distance = np.hypot(cx - frame_center[0], cy - frame_center[1])
marker_key = (i, cx, cy)
            if distance < 100 and marker_key not in passed:
                score += 10
                passed.add(marker_key)
                play_point_sound()
print(f"Hit marker {i}! +10 points. Score: {score}")
# 通過済みマーカーには常にXを表示
if marker_key in passed:
cv2.putText(frame, "X", (center_pos[0] - 20, center_pos[1] + 20),
cv2.FONT_HERSHEY_SIMPLEX, 2.0, (0, 0, 255), 5)
# スコア表示
cv2.putText(frame, f"Score: {score}", (30, 50),
cv2.FONT_HERSHEY_SIMPLEX, 1.5, (0, 255, 0), 3)
cv2.imshow("Tello AR 7Shapes", frame)
if cv2.waitKey(1) == 27:
break
# --- 終了処理 ---
send('land')
cap.release()
cv2.destroyAllWindows()エラー: 接続されたアカウントがありません。
アカウントを接続するには、YouTube Feeds の設定ページに移動してください。